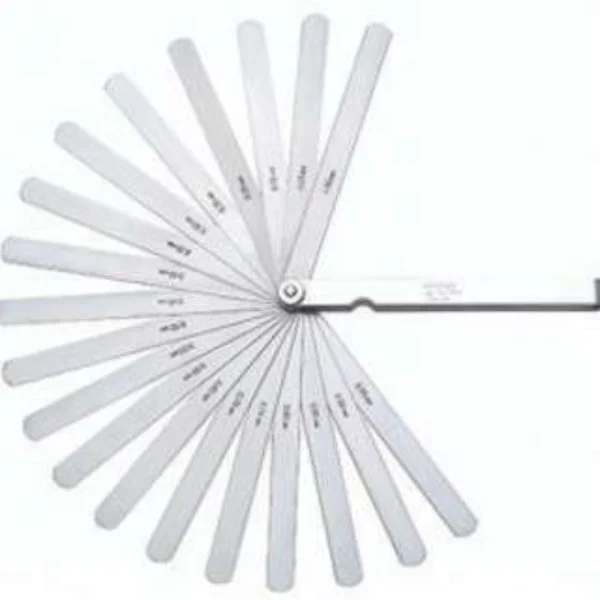
A feeler gauge checks the width of a gap by inserting a thin, precisely known blade between two surfaces. Select a blade close to the expected clearance, slide it into the gap, and feel for light, consistent drag along its full length. A blade that fits with even resistance, without forcing, matches the actual gap width.
What You Need Before You Start
Related: Mitutoyo feeler gauge sets
You will need a feeler gauge set covering the expected clearance range, either metric, imperial, or a combined set, and a clean, dry gap free of debris, oil film, or built-up dirt that could give a false reading.
If the specified clearance value is unknown, check the equipment manufacturer’s service documentation first. A feeler gauge confirms whether an existing gap matches a spec; it does not tell you what that spec should be.
Step 1: Identify the Gap and the Reference Value
Locate the exact gap you need to check and confirm the specified clearance value from the equipment manual or job drawing before picking up the gauge. Working from a confirmed spec, rather than an assumed one, avoids a correct measurement being read against the wrong target.
Note whether the specification is given as a single value or a tolerance range, since this changes how you interpret the result once you have it.
Step 2: Select a Starting Blade or Combination
Choose the single blade, or combination of stacked blades, closest to the specified clearance value. Most feeler gauge sets allow two or more thin blades to be stacked together to reach an in-between thickness that no single blade covers.
Handle blades by their ends rather than flexing them across the middle, since a bent blade will not seat flat against both surfaces and can give a misleading reading.
Step 3: Insert the Blade with the Correct Drag
Slide the selected blade into the gap without forcing it. A correctly matched blade enters with light, even resistance, often described as a slight drag, along its entire width, not a loose rattle and not a jammed, forced fit.
If the blade slides in with no resistance at all, it is thinner than the actual gap. If it will not enter smoothly, or only enters part way before binding, it is thicker than the gap and the next blade down should be tried.
Step 4: Check at Multiple Points Along the Gap
Where the gap runs along a length, such as a valve clearance point or an alignment gap on a machine bed, check it at more than one position rather than relying on a single insertion point.
A gap that feels correct at one end but tight or loose at the other usually indicates uneven surfaces or a misaligned component, which is a separate finding from the clearance value itself and is worth noting alongside the reading.
Step 5: Record the Result and Compare Against Spec
Once a blade, or stacked combination, gives a consistent light-drag fit across the checked points, record its marked thickness value against the specification from Step 1.
Where the result sits outside the allowed tolerance, that reading becomes the basis for an adjustment, a shim change, or a follow-up inspection, depending on what the gap is controlling.
Common Mistakes to Avoid
Forcing a slightly thick blade into a gap is the most common feeler gauge error, since a firm push can make an incorrect blade feel like it fits. Always look for light, natural drag rather than a forced entry.
Checking only one point on a long gap can also mislead the result if the surfaces are not perfectly parallel. Testing at two or three points along the gap reduces this risk considerably.
Using a bent, nicked, or worn blade is another frequent source of error, since damage along the blade’s edge changes its effective thickness at the contact point. Inspecting blades before use catches this before it affects a reading.
Types of Feeler Gauges
Related: feeler strip
Standard blade-type feeler gauges are the most common configuration: a folding set of flat steel blades, each marked with its thickness, housed in a single pivoting body similar to a pocketknife.
Wire, or round, feeler gauges use a precisely sized wire loop instead of a flat blade and are often preferred for checking spark plug gaps, where a curved gap suits a round profile better than a flat one.
Taper feeler gauges combine a tapered, marked blade with a sliding scale, allowing a single blade to indicate a range of gap widths in one insertion rather than requiring separate blades for each value.
Metric vs Imperial Feeler Gauge Sets
Metric feeler gauge blades are marked in millimetres, commonly spanning a range from a few hundredths of a millimetre up to around one millimetre or slightly more in a standard general-purpose set.
Imperial blades are marked in thousandths of an inch and cover a broadly comparable working range using the inch-based scale instead. Combined sets include both scales on separate blades within the same folding body, which suits facilities that service equipment built to either standard.
Common Applications
Feeler gauges are widely used to check valve clearance during engine servicing, spark plug gap on ignition components, and brake pad or caliper clearance during vehicle maintenance.
In industrial and workshop settings, they check alignment gaps between machine components, backlash in gear trains, bearing clearance during assembly, and the shut height or parting-line gap on moulds and dies.
They are also used as a quick go or no-go style check during incoming inspection, confirming a manufactured gap sits within an acceptable range before a part or assembly moves to the next stage.
Feeler Gauge vs Other Clearance-Checking Methods
A feeler gauge gives a fast, direct physical reading of a gap and needs no power source or setup time, which makes it the practical choice for field service and routine maintenance checks.
For a gap that is difficult to access directly, or where a permanent record of the value is needed, a dial indicator set up across the gap, or an internal comparator gauge, can offer a more repeatable, documented reading, though at the cost of longer setup time.
Neither method replaces the other outright. A feeler gauge remains the faster first-choice tool for a routine, accessible clearance check, while dial-based methods suit higher-volume or more formally documented inspection work.
For clearances that a rigid blade cannot physically reach, such as some internal engine bearing clearances, a soft, deformable measuring strip placed between the surfaces and then compared against a printed scale after compression is a widely used alternative. It works on a different principle from a feeler gauge, measuring the gap indirectly through deformation rather than directly through blade insertion, and is generally treated as a specialised, single-use method rather than a routine daily tool.
Checking Accuracy and Knowing When to Replace a Set
A feeler gauge blade’s accuracy depends on its thickness staying true to its marked value, so a set that has been dropped, bent, or heavily used over time is worth periodically checking against a known reference gap or a gauge block of matching thickness.
Light surface wear on a blade’s contact edge from repeated insertion is normal over a long service life, but a blade that visibly rocks, shows a burr, or no longer matches a known reference should be retired rather than kept in active use. A worn blade in an otherwise complete set is easy to overlook until it produces a misleading reading on a critical check.
For facilities that log calibration on their measuring tools, a feeler gauge set is generally lower-maintenance than a dial or digital instrument, but it still benefits from being included in a periodic verification routine rather than assumed accurate indefinitely.
Feeler Gauges in a Documented Inspection Workflow
In a formal QC or incoming-inspection setting, a feeler gauge reading is often recorded alongside the part or job reference, the specified tolerance, and the blade or combination used, rather than simply confirmed as a pass or fail by eye.
This matters most where the same clearance is checked repeatedly over a production run or a maintenance schedule, since a recorded trend can flag a gap that is drifting toward the edge of tolerance before it fails a check outright.
Where a documented, traceable reading is required for a critical clearance, some facilities follow a feeler gauge check with a dial indicator or comparator reading as a secondary, recorded confirmation, using the feeler gauge as the fast first-pass screening step.
Caring for and Storing a Feeler Gauge Set
Feeler gauge blades are thin and can be bent or nicked if handled roughly, which changes their effective thickness at the point of damage. Folding blades back into the housing after use, rather than leaving them extended, protects them during storage.
Wiping blades clean of oil and debris before folding them away helps prevent corrosion between uses. Periodically checking a blade against a known reference gap is a simple way to confirm a set has not been damaged or mixed with another.
Feeler Gauges in Automotive vs Industrial Maintenance
In automotive service work, a compact feeler gauge set is typically used for routine tasks such as spark plug gapping and valve clearance checks during scheduled servicing, often alongside a torque wrench for the associated fasteners.
In industrial maintenance and toolroom settings, feeler gauges more often check machine alignment, bearing and gear clearances, and mould or die gaps, frequently as part of a documented preventive-maintenance or incoming-inspection routine rather than a one-off check.
Selecting the Right Feeler Gauge Set for Your Facility
The right set depends primarily on the clearance range your equipment actually requires. A facility working mainly with fine electronic or precision-assembly clearances needs a set weighted toward its thinner blades, while general mechanical maintenance typically needs a broader spread across the full range.
Blade material and finish also affect durability. A well-finished, corrosion-resistant blade set holds its accuracy longer in a high-use environment, which matters where the same set is checked many times a day across a shift.
Where This Applies
Feeler gauges are used across automotive servicing, general industrial maintenance, tool and die work, and incoming inspection wherever a physical gap needs to be checked against a known value quickly and without specialised equipment.
They are also a standard item in a field service technician’s kit, since a compact set covers a wide range of routine clearance checks without adding significant weight or bulk to a service bag.
Common mistakes when using a feeler gauge include forcing a slightly thick blade into a gap, checking only one point along a longer gap, and using a bent or nicked blade without inspecting it first. Working methodically from an estimated starting blade, and checking for light, even drag, avoids most of these errors.
FAQs
What does it mean if a feeler gauge blade feels loose in the gap?
A loose fit means the blade is thinner than the actual gap. Try the next thicker blade in the set, or a stacked combination, until you find one that seats with light, even drag.
Can feeler gauge blades be stacked together for an in-between reading?
Yes. Most sets allow two or more thin blades to be held together to reach a combined thickness that no single blade in the set covers on its own.
How do I know if I should use a metric or imperial feeler gauge?
This depends on the equipment manufacturer’s specification. Check whether the service documentation states the clearance in millimetres or thousandths of an inch, and select a set marked to match.
Why would I use a wire feeler gauge instead of a blade type?
A wire, or round, feeler gauge suits curved gaps, such as a spark plug electrode gap, where a flat blade does not sit against the curved surface as consistently as a round wire profile does.
What causes a feeler gauge blade to bind partway into a gap?
Binding partway usually means the blade is slightly thicker than the gap, or that the gap narrows unevenly along its length. Try the next thinner blade and check the gap at more than one point.
How accurate is a feeler gauge compared to a dial indicator?
A feeler gauge gives a fast, direct physical reading suited to routine checks. A dial indicator set up across a gap can offer a more repeatable, documented reading for higher-precision or formally recorded inspection work.
Can a damaged feeler gauge blade still be used?
A bent, nicked, or worn blade edge changes its effective thickness at the contact point and can produce a misleading reading. Inspect blades before use and replace any that show visible damage.
Why does my feeler gauge give a different reading at each end of a gap?
An inconsistent reading along a gap usually points to uneven surfaces or a misaligned component rather than a fault with the gauge itself. This is worth recording separately from the clearance value.
Do I need a different feeler gauge set for automotive versus industrial work?
Not necessarily, though the useful blade range often differs. Automotive tasks such as valve clearance and spark plug gapping typically sit within a narrower range than some industrial alignment or gear-backlash checks.
How should a feeler gauge set be stored to protect the blades?
Fold blades back into the housing after use rather than leaving them extended, and wipe off oil or debris before storing the set. This limits bending, nicking, and corrosion between uses.
What is the difference between a feeler gauge and a taper feeler gauge?
A standard feeler gauge uses separate flat blades, each of a fixed thickness. A taper feeler gauge combines a single tapered blade with a sliding scale, letting one blade indicate a range of gap widths.
Can a feeler gauge tell me what a clearance specification should be?
No. A feeler gauge only measures the gap that is physically present. The correct specification always comes from the equipment manufacturer’s documentation or the relevant engineering drawing.
Is a forced feeler gauge fit ever acceptable as a reading?
No. A blade that only enters with force is not a true match for the gap. The correct reading is the thickest blade, or combination, that enters with light, even drag along its full length.
What is the typical thickness range covered by a general-purpose feeler gauge set?
General-purpose metric sets commonly span from a few hundredths of a millimetre up to around one millimetre or slightly more, with imperial sets covering a broadly comparable range in thousandths of an inch.
Request a Quote — Contact BTSA for product selection guidance and calibration support.