Gauge blocks are precision reference standards used to calibrate instruments and set comparator stands to a known dimension. They are combined by wringing, a technique that slides two clean, flat block faces together so they adhere and form an accurate stacked length, allowing a small set of blocks to produce a very wide range of reference dimensions.
What You Need Before You Start
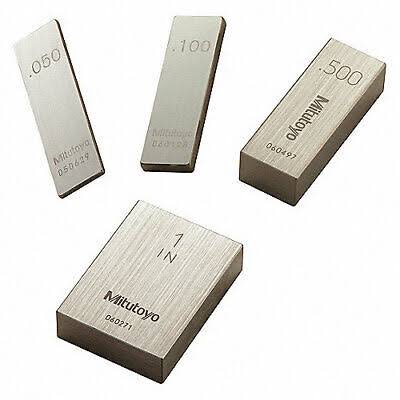
Related: Mitutoyo gauge blocks
You will need a gauge block set appropriate to the grade required for the task, a clean, lint-free cloth, a stable, temperature-controlled work surface, and, if setting a comparator, the stand and indicator to be set.
Gauge blocks are sensitive to temperature. Allow blocks to reach the ambient temperature of the work area before use, particularly if they have just come out of a storage case in a different room.
Step 1: Select the Correct Grade for the Task
Gauge block grades reflect different accuracy tolerances, with tighter grades reserved for calibration-lab reference work and coarser grades suited to shop-floor instrument setting. Using an unnecessarily tight grade for routine setting work adds cost without adding practical value; using too coarse a grade for calibration work introduces avoidable error.
Step 2: Calculate the Block Combination
Work systematically from the smallest required decimal place outward toward the larger digits. Select a block that eliminates the last digit of the target dimension first, then work through progressively larger blocks in sequence until the full target length is reached, using as few individual blocks as possible to minimise the total number of wrung joints in the final stack.
Step 3: Clean Each Block Face
Wipe each measuring face carefully with a clean, lint-free cloth immediately before wringing, removing any oil film, dust or fingerprints completely. A contaminated face will not wring correctly and can also damage the block’s precision surface over time.
Step 4: Wring the Blocks Together
Slide the flat face of one block across the face of the next at a slight angle, applying light pressure, until the two faces engage and adhere. A correctly wrung joint feels solid, with no perceptible gap, and the blocks should not separate under normal handling.
Build the stack progressively, wringing the largest blocks first and working down to the smallest, so each addition is easier to align precisely and each joint seats correctly before the next block is added.
Step 5: Set the Comparator Stand
Related: comparator stand setup
Place the wrung gauge block stack carefully on the comparator’s anvil or base, gently lower the indicator’s contact point onto the top face, and zero the dial or digital display precisely to that reference length. The comparator is now correctly set and ready to measure deviation from that exact reference dimension.
Step 6: Separate and Store the Blocks
After use, slide the blocks apart rather than pulling them straight off, to avoid unnecessary wear on the faces. Clean each block again before returning it to its case, and avoid leaving blocks wrung together for extended storage periods.
Common Mistakes to Avoid
Skipping the cleaning step before wringing is the most common cause of a poor joint. Using more blocks than necessary for a given dimension also increases the cumulative error introduced by each wrung joint.
Handling blocks with bare, warm hands for extended periods can transfer heat and affect the block’s dimension slightly, particularly for tight-grade laboratory work. Gloves or a handling tool reduce this risk.
Gauge Block Materials: Steel, Chrome Carbide and Ceramic
Steel gauge blocks are the most common and generally the most cost-effective option, suitable for most shop-floor and general calibration work. They are, however, more susceptible to corrosion and wear over repeated handling than harder materials.
Chrome carbide blocks offer greater hardness and wear resistance than plain steel, which extends their working life in environments with frequent use, at a higher cost per set.
Ceramic gauge blocks, typically zirconia-based, offer strong resistance to wear, corrosion and magnetism, and are less affected by minor temperature fluctuations than metal blocks because of their lower thermal expansion. They are more brittle than metal blocks, though, and can chip if dropped or handled roughly.
Temperature Control and Environmental Best Practice
Gauge blocks are dimensioned at a standard reference temperature, commonly 20 degrees Celsius, and their actual length changes slightly with temperature due to thermal expansion. For most shop-floor setting work this effect is negligible, but for calibration-lab reference use, allowing blocks and the part or instrument being checked to reach the same stable ambient temperature before measurement matters.
A stable, draft-free work surface away from direct sunlight, heaters or machinery that generates heat reduces the risk of temperature-related measurement drift during a calibration session, particularly for extended measurement runs using tight-grade reference blocks.
Traceability and Certification of Gauge Block Sets
A gauge block set intended for calibration-lab reference use should come with a certificate of calibration showing the actual measured length of each block against a national or internationally traceable standard, along with the date of that verification.
Recalibration intervals for gauge block sets depend on frequency of use and the criticality of the work they support, and should be set according to your quality system’s requirements rather than assumed from the manufacturer’s original certification date alone.
Troubleshooting Wringing Problems
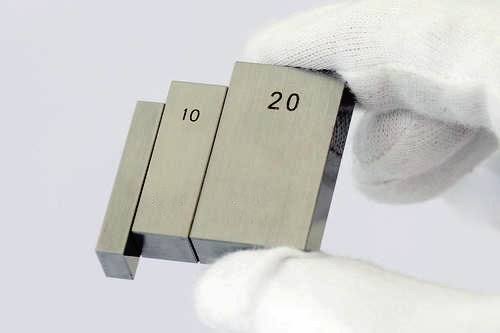
If blocks consistently fail to wring even after cleaning, check the block faces under good light for visible scratches, dings or corrosion, since physical damage to a measuring face prevents a proper seal regardless of how clean it is.
A block that wrings but separates too easily under light handling may indicate a face that is no longer sufficiently flat, which is a sign the block should be checked against a reference or sent for recalibration rather than continuing in service.
Gauge Block Sets: Choosing the Right Piece Count
Gauge block sets are sold in different piece counts, commonly ranging from small sets of around a dozen blocks up to sets of 80 or more pieces. A larger piece count generally allows more target dimensions to be reached with fewer blocks wrung together, which reduces cumulative wringing error and speeds up building a given stack.
A smaller, lower-piece-count set is often adequate for a tool room that only needs to set a handful of recurring dimensions, while a calibration laboratory verifying a wide range of customer instruments typically benefits from a larger, more comprehensive set that can reach almost any required length with a minimal number of blocks.
It is worth matching the set’s increment structure, not just its total piece count, to the kind of dimensions you most often need to build, since two sets with the same number of blocks can differ significantly in how efficiently they reach a given target length.
Using Gauge Blocks for Angle and Sine Bar Setups
Beyond linear length measurement, gauge blocks are also used with a sine bar to set up and verify precise angles. A sine bar is a precision bar with two cylinders of equal diameter mounted a fixed, known distance apart. Raising one end on a calculated gauge block stack tilts the bar to a specific angle, based on simple trigonometry linking the block height, the sine bar’s roller spacing, and the target angle.
This technique is commonly used to set up angular workholding fixtures, verify tapered or angled machined features, and check angle gauges themselves against a traceable reference. Because the accuracy of the resulting angle depends directly on the accuracy of the gauge block stack used to raise the sine bar, this is one of the applications where gauge block grade and correct wringing technique matter most.
Handling Protocols to Extend Gauge Block Life
Beyond basic cleaning, a few handling habits meaningfully extend a gauge block set’s working life. Picking blocks up by their sides rather than their measuring faces, wherever the block size allows, reduces the chance of transferring oils or fingerprints onto the critical wringing surfaces.
Using a dedicated handling tool or forceps for smaller blocks, rather than fingers, further reduces both contamination and the risk of dropping a block, since even a small chip on an edge can eventually propagate toward the measuring face with continued use. Returning every block to its designated slot in the case, rather than a general storage tray, also prevents blocks of different sizes knocking against each other in transit.
How Grade Selection Affects Cost and Lead Time
Tighter gauge block grades generally cost more per set than coarser grades of the same piece count and material, reflecting the additional manufacturing precision and more rigorous verification behind each block’s certified length. For routine shop-floor comparator setting, specifying a grade tighter than the task actually requires adds cost without a corresponding practical benefit.
Calibration and recertification lead time can also differ by grade, since tighter-grade sets may require more careful measurement during recertification to confirm they still meet their original tolerance. Building this lead time into a calibration schedule, rather than assuming every gauge block set turns around equally quickly, helps avoid a set being unexpectedly unavailable when it is next needed.
A practical approach for many facilities is to hold a smaller, tighter-grade set reserved specifically for calibration-lab reference work, alongside a separate, coarser-grade set for day-to-day shop-floor setting, rather than using a single set for both purposes and risking excess wear on blocks meant to serve as the facility’s primary reference standard.
Common Signs a Gauge Block Set Needs Recertification
A gauge block set does not always announce that it has drifted out of tolerance, which is why relying on scheduled recertification rather than waiting for an obvious problem matters. Warning signs worth acting on immediately include blocks that no longer wring as solidly as they once did across the set, visible dulling or fine scratching on multiple measuring faces, and any instance where the set was dropped or otherwise mishandled.
A comparator or other instrument that was recently set with the block stack behaving differently than expected, without any change to the part being measured, is also worth investigating as a possible sign that the reference blocks themselves, not the part or the comparator, have drifted and need checking against a higher-level standard.
Where This Applies
Gauge blocks are used to calibrate micrometers, height gauges and dial bore gauges, to set comparator stands and snap gauges to a known dimension, and as fixed-length reference tooling in incoming inspection.
In a calibration laboratory, gauge blocks also serve as the working link in the traceability chain, allowing a lab to verify shop-floor instruments against a standard that is itself traceable back to a national metrology institute.
Correct gauge block use depends on selecting the right grade for the task, keeping the blocks clean and free of burrs, and wringing no more blocks together than necessary, since each wrung joint adds a small amount of potential error to the final stacked length.
FAQs
What does wringing gauge blocks mean?
Wringing is the technique of sliding two clean, flat gauge block faces together at a slight angle so they adhere through a thin film of air and molecular attraction, forming a single accurate stacked length.
How many gauge blocks should I use for one dimension?
Use as few blocks as possible to reach the target dimension, working from the smallest required decimal place outward. Fewer blocks means fewer wrung joints, and each joint adds a small amount of potential error.
Why won’t my gauge blocks wring together properly?
The most common cause is a contaminated block face, such as oil, dust or a fingerprint. Clean both faces thoroughly with a lint-free cloth immediately before attempting to wring them again.
What is the difference between gauge block grades?
Gauge block grades reflect different accuracy tolerances. Tighter grades are used for calibration-lab reference standards, while coarser grades are typically sufficient for general shop-floor instrument setting.
Can gauge blocks be used to set a snap gauge?
Yes. A gauge block stack, or a master ring, is a standard method for setting a dial snap gauge to its nominal dimension before use.
How should gauge blocks be stored between uses?
Gauge blocks should be cleaned, separated rather than left wrung together, and stored in their case away from moisture, dust and significant temperature swings.
What is the difference between steel and ceramic gauge blocks?
Steel blocks are cost-effective and suit general use, but are more prone to corrosion and wear. Ceramic blocks resist wear, corrosion and temperature-related expansion better, but are more brittle and can chip if handled roughly.
How often should a gauge block set be recalibrated?
Recalibration frequency depends on how often the set is used and how critical the work is. It should be set according to your quality system’s requirements rather than assumed from the original certification date.
What piece count should a gauge block set have?
A larger piece count generally lets you reach more target dimensions with fewer blocks, reducing wringing error. A small tool-room set may only need a dozen or so blocks; a calibration lab typically benefits from a larger, more comprehensive set.
Can gauge blocks be used to check an angle, not just a length?
Yes, when paired with a sine bar. Raising one end of the sine bar on a calculated gauge block stack tilts it to a precise angle, based on the block height and the bar’s fixed roller spacing.
Why do tighter gauge block grades cost more?
Tighter grades require additional manufacturing precision and more rigorous verification behind each block’s certified length. For routine shop-floor setting, a grade tighter than the task requires adds cost without a practical benefit.
What are common warning signs a gauge block set needs recertification?
Blocks that no longer wring solidly, visible dulling or scratching on measuring faces, and any instance of the set being dropped or mishandled are all signs to check the set against a reference standard before continuing to use it.
Should I use the same gauge block set for calibration and shop-floor work?
Many facilities prefer separating them: a smaller, tighter-grade set reserved for calibration-lab reference work, and a separate coarser-grade set for day-to-day shop-floor setting, to avoid excess wear on the primary reference standard.
Can gauge blocks be used with a sine bar to set an angle?
Yes. Raising one end of a sine bar on a calculated gauge block stack tilts it to a precise angle, based on simple trigonometry linking block height, the bar’s fixed roller spacing, and the target angle.
What handling habits extend a gauge block set’s working life?
Picking blocks up by their sides rather than their measuring faces, using a handling tool for smaller blocks, and returning each block to its designated case slot all reduce contamination and accidental damage over time.
Why does gauge block set piece count matter when planning a purchase?
A larger piece count generally lets you reach more target dimensions with fewer blocks wrung together, reducing cumulative error and speeding up building a given stack, so matching piece count to your typical dimension range is worth planning for.
Request a Quote — Contact BTSA for product selection guidance and calibration support.